Quantcast
Channel: Digital Forensics Today Blog
Viewing all 114 articles
Browse latest View live

EnScript and Python: Exporting Many Files for Heuristic Processing - Part 1

$
0
0
James Habben with Chet Hosmer

I discovered something very cool this year at CEIC: people actually read my blog posts! The realization came when I found out there were two sessions focusing on Python, and both of them talked about my #en2py techniques that I presented in this blog last year.

One of the sessions, Heuristic Reasoning with Python and EnCase, was presented by the Python forensics guy, Chet Hosmer of python-forensics.org. I got a chance to chat with him after his session, and the discussion led to what you are about to read. Chet has a number of Python scripts that can make a difference in forensic cases, and we decided a joint blog post would be a fun way to touch on the integration between EnCase and Python with another technique. This will be a two-part post with the first part focusing on getting the files out. The second will get some fancy on it by putting a GUI on the front to accept options in the processing. I will now let Chet explain the benefits of his work.

Function and Benefits of Heuristic Reasoning

Applying heuristics during deep-dive investigation allows us to apply rules of thumb during the process. In order to bring this to light, we chose to integrate a Python script that performs “what I call” heuristic indexing of binary files. Binary files like memory snapshots, executable files and photo graphic images have ASCII text embedded with the binary data. Extracting these “text sequences or remnants” and then making sense of them can be a challenge. 

The issue with traditional approaches like dictionary comparisons or keyword lists, is the occurrence of misspelled words, slang, technical jargon, malware strings, filenames, and function names. These can all be missed because they are not in the dictionary or keyword list, an example is shown in the Casey Anthony investigation. Another traditional approach would be to report on all “text sequences or remnants” this can results in a voluminous number of nonsensical meaningless text strings that can overwhelm investigators.

My approach (originally outlined in my text, Python Forensics) uses a set of 400,000 common English words, (loosely a mini corpus of words) to generate a weighted heuristic model.  I have since created additional models for medical and pharmaceutical domains and I’m working on common words used within text messages.  

Using Python, I load the specific weighted heuristics into a Set. Then during the process of extracting “text sequences or remnants” from the binary file(s), the same algorithm is applied to each extracted sequence as was used to build the weighted heuristics. The calculated heuristic is then used as a lookup value. If the value is found in the loaded weighted set, then the word is considered probable and reported. One other final step I should mention…. most languages have what are referred to as “stop words” such as, (whenever, always, another, elsewhere etc). English is no exception. These stop words are filtered from the final list as they typically have little probative value. Each identified word that passes these filters is stored in a dictionary, one of the great built-in data structures within Python. Dictionaries are key, value pairs, in this case the key is the probable word string and the value is the number of times the word is discovered. This allows me to then produce a resulting list of probable words either sorted alphabetically or by frequency of occurrence.

Therefore, the bottom line benefits of heuristic indexing include:
  1. Accurate identification of a broad set of probable words from binary data
  2. Slang, technical jargon, filenames, misspelled words are also identified
  3. Strings that represent nonsense strings are filtered out
  4. Common stop words are ignored
  5. The frequency of words found or alphabetical results are possible
  6. New weighted heuristic models can be created
In order to apply this method more broadly to a case instead of a single file, we needed a method to allow EnCase (via an EnScript), to export multiple selected files to be processed by the Python script. I turned to James, the EnScript Guru for help.

Method of Choosing Files

In my previous posts, I used a simple technique in EnScript to send the highlighted file out from EnCase to the local disk to allow for a Python script to access the data. This works great for Python scripts that are designed to process one file at a time, but it is not very efficient for the examiner when that one file has not been pinpointed yet. There are many Python scripts out there that are designed to process a whole set of files in a designated folder.

In another post, I looped through files in the case, but I was targeting certain filenames known to contain evidence from Windows 8 Phone apps. The structure there is similar to what I have here, but the interaction with Python is the difference.

Chet and I talked at CEIC about how to do exactly this in EnScript, and came to the conclusion that the rest of the world should know about this as well! OK, maybe not the world, but I’m sure you appreciate that we didn’t keep this buried in some dark closet somewhere.

I have talked about ItemIteratorClass before, but it was in a simple post about the changes in EnScript from EnCase v6 to v7. This is the class that gives us access to all of the files in the case. There are a lot of options explained in that post, so I won’t drag it out here. The mode we will focus on is CURRENTVIEW_SELECTED, which will give us a collection of the files that the examiner has blue-checked in the EnCase interface before running the EnScript.

Because we are processing multiple files, the execution of the Python script needs to happen once the loop is complete. The loop will be doing the work of identifying selected files and exporting them to the disk.

EnScript Walkthrough

The usage of ItemIteratorClass starts off with setting some values in variables. I defined these as global variables for reasons you will see in part 2. The mode I chose here allows an examiner to blue-check any number of files in EnCase, and send this collection to the EnScript for export.

The NOPROXY is used because I am not looking to get any hashes calculated and it speeds up the loop. The NORECURSE option is also used to speed up the loop. With the mode using the current view, the recursing into compound files isn’t possible, anyway.


Then we enter into the loop to find all of the files. There's a fairly bulky chunk of code here, but it has a purpose behind it. When you are dealing with files from evidence, you are potentially pulling files from folders all over the drive. Chances are good you will find a couple files with the same name. On line 22, I am using a GUID that is generated by EnCase and is unique inside the evidence file. Lines 20-23 all together are modifying the filename to include this GUID, but also retain the same extension for identity.


There is a little irritation that pops up when you use any of the modes focusing on the current view. It locks that view in EnCase for the examiner running the EnScript while the iterator is active. Line 31 happens immediately after the looping export code, and this clears the iterator to release the view for the examiner while Python does its thing. Little things matter!


Depending on the Python script you are using and the amount of data you are processing, you may have to adjust the timeout value on line 41. If this value is not large enough, the output from Python will be either missing or cut short.


You're getting a two-for-one deal in this joint blog post, because now Chet is going to explain some Python code now. (I don’t want to read any complaints about the length of this post!)

Python Walkthrough

The overview of the Python script is shown in the figure below:


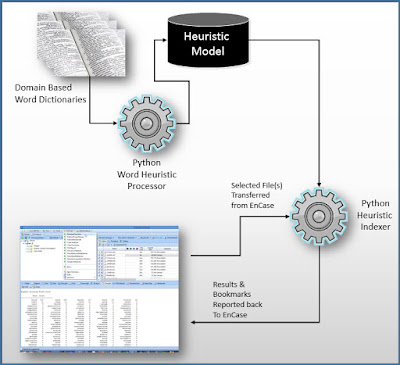
The Script employs a Heuristic Model created from one or more word dictionaries. Dictionaries and vernaculars can be expanded through the training of the model. The Heuristic Indexer receives selected file(s) from EnCase and then extracts possible word strings from each of the files. Heuristics are calculated for each extracted string and then compared against the Heuristic Model. The result is a report that is delivered back to EnCase.

For Part I of the blog I want to focus on the primary integration between James’ EnScript and the Python Heuristic Indexer.

The main entry point for the Python Script prints out some information messages and then obtains the path and individual filenames exported by the EnScript by parsing the command line arguments. Then for each file found, the IndexAllWords() function is called to perform the string extraction and subsequent Heuristic analysis.  I have highlighted the key lines of the Python script.

Python Main Entry Point

# Main program for pyIndex

if __name__ == "__main__":

    # Print Script Basics
    print "\nHeuristic Indexer v 1.1 CEIC 2015"
    print "Python Forensics, Inc. \n"

    print "Script Started", str(datetime.now())
    print

    # Obtain the arguments passed in by the Enscript
    # In Phase I the only argument passed is
    # path where the EnScript copied the selected files

    targetPath = ParseCommandLine()
 
    print "Processing EnCase Target Path: ", targetPath
    print

    # using the targetPath, obtain a list of filenames
    # using the Python os module

    targetList = os.listdir(targetPath)
 
 
    # Creating an object to process
    # probable words
    # the matrix.txt file contains heuristic model

    wordCheck = classWordHeuristics("matrix.txt")
 
    # Now we can iterate through the list of files
    # Calling the IndexAllWords() function for each
    # file. The IndexAllWords() performs the word
    # extraction, heuristic processing and reports
    # results back to EnCase via Standard Out

 
    for eachFile in targetList:
     
        fullPath = os.path.join(targetPath, eachFile)
        print "####################################"
        print "## Processing File: ", eachFile
        print "####################################\n"
     
        IndexAllWords(fullPath, wordCheck)
 
    print "Script Ended", str(datetime.now())
    print

    # Script End

Results: So What Do I Get From All of This?

Here is a screen shot and an abbreviated excerpt from an actual EnCase / Python marriage.
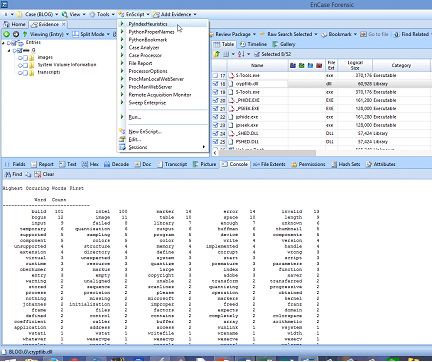

Closing Thoughts

James: This was a new (and exciting) opportunity for me to have a guest author in a joint post. I am so happy to hear that my #en2py techniques have helped others. EnCase is a powerful platform on its own, but enhancing it with the libraries available in other languages and tools just makes everything that much better for examiners. I hope you find this useful and thanks for taking the time to read through this!

Chet: The catalyst behind Python Forensics, Inc. is to create a collaborative environment for the rapid development of new investigative scripts that can directly benefit investigators.  I hope this blog will get you interested in developing and/or using EnScripts and Python in your next endeavor.  I would like to thank James for his enthusiasm for the project and I look forward to Part II.

The Final Details

Download the EnScript here.
Download Chet's Python script here.
Look for an email invitation and announcements on Twitter about an upcoming webinar we're planning with Chet called, "EnCase and Python: Extending Your Investigative Capabilities."

Chet Hosmer
@PythonForensics
Founder of python-forensics.org

James Habben
@JamesHabben
Master Instructor at Guidance Software


Why Now is the Time to Make the Move to EnCase® Version 7

$
0
0
Robert Bond

I’ve been fortunate enough to meet a number of forensic investigators—both in law enforcement and inside corporations—and to hear a little about how they do their work. All of us in every line of work have preferred tools, checkpoints, and workflows, so it can be very easy to procrastinate on making the change to a new version of a favorite tool. However, I’m genuinely excited to tell you that, if you’ve been waiting for the right time to upgrade to EnCase Forensic version 7, that time is now.

Making the switch has been a productive choice for a number of our community of users. Take Dave Papargiris of Evidox, for instance. At the welcome reception at last year’s CEIC® he told me, “I’ve started transitioning over to v7 and there are definite advantages.” He “grew up” on v6, but took the plunge, and is seeing how his work gets faster and with less effort at Version 7.

We believe you can work with more power and speed at Version 7, and to help you do that, we’re offering the EnCase Forensic v7 upgrade package – both product and training – at 80 percent off. Yes—80 percent.

What’s in it For You?

Plenty:
  • A faster, more powerful processor
  • Support for more OSes and applications you work with
  • Remote forensic capability
  • Integrated smartphone and tablet module
  • Over 100 metadata-based reports in Case Analyzer
  • More than 130 task-focused apps and EnScripts® on EnCase® App Central
    It’s a great time to make the move. I hope you’ll take advantage of this unprecedented offer today, because it ends on August 31. Call us at 1 (888) 999-9712 today, and look for some more blog posts in the coming weeks that focus in on how to do things in v7 that you do multiple times a day in v6.

Password Recovery Can be Practical

$
0
0
Guidance Software’s Tableau Unit recently released Tableau™ Password Recovery, a hardware + software solution to accelerate password attacks on protected files, disks, and other containers.

It’s always fun to play with new toys, and when the new hotness is a purpose-built, linearly scalable, password-cracking behemoth, how can one not share? I did a bit of digging while running a two-server Tableau Password Recovery setup through its paces in our labs here in Pasadena, California, and while I found many good tools and tutorials for password cracking, I found it difficult to differentiate the theoretically possible from the actually practical. Here are some thoughts from that process.

Data protection is ancient

Each step forward in communication technology has been accompanied by a corresponding technology to protect the idea itself. Ancient Greeks used a scytale, a rod wrapped with a strip of parchment, to protect messages on the battlefield. Presumably, cryptanalysts of the day had to be moderately talented at woodwork. 

While data protection is ancient, our tools don’t have to be. Modern cryptography and cryptanalysis is not the stuff of whittlers, but rather mathematicians and statisticians. One can’t throw a scytale these days without hitting protected data, increasingly protected by strong cryptography: more math than most computers can deal with effectively. The domain of the problem is massive, making it costly to solve in terms of compute and duration. The good news is we know the math, and there are established techniques we can use. 

The problem in practice decomposes into a few pieces:
  1. How to detect protected data?
  2. How to expose protected contents for human review?
  3. How to scale and manage effectively?

Disk and file encryption

Full-disk encryption is commonplace and arguably in in most enterprises is the norm. We know detecting full disk encryption is useful to investigators, because one of the most consistently popular blog posts here is Graham Jenkins’ Spotting Full Disk Encryption. Graham points out how EnCase® provides visibility to the encrypted data itself, which can inform the investigator of appropriate next steps. EnCase also determines the encryption provider and prompts for credentials. The screenshot below appears when I attempt to preview my own encrypted OS drive:

Our team works with major disk encryption solutions such as: Check Point Full Disk Encryption, Credant Mobile Guardian and Dell Data Protection, GuardianEdge, McAfee Endpoint Encryption, Microsoft BitLocker, Sophos SafeGuard, Symantec PGP, Symantec Endpoint Encryption, and WinMagic SecureDoc.  This is made possible through direct collaboration with the individual encryption vendors, and it's well worth the effort. 

What are we dealing with? Detecting protected files

Getting access to the volume itself is just one step. In EnCase, we use file signature analysis to examine the file extensions, headers and footers of files to determine if their appearance in the file system is consistent with the data they truly represent. 

Let’s say we have a password-protected Excel 2010 workbook. The workbook is still recognizable by signature analysis as an Excel workbook, but if you tried to open the file, you’d be asked for a password. If you examine the contents of the workbook in Hex or Text views, you’d see seemingly meaningless data. 


But is this file actually protected? If so, how is it protected? We can answer this by running Protected File Analysis in the EnCase Processor. EnCase uses the Passware Encryption Analyzer to identify encrypted and password-protected files. Protected file analysis is available in all EnCase editions, including EnCase® eDiscovery, where protected files are automatically identified as exceptions during processing.


After Protected File Analysis, we can see which files are protected, and also what type of password recovery method is required to unlock the contents. 


Even just these two pieces of data inform the next steps of our case.

Peering inside: Using Passware and EnCase

Now that we’ve identified the file as protected, and we know specifically how it is protected, all we have to do is to open it! Unfortunately, this is where the “more math than computers can handle efficiently” issue appears. Fortunately, we have a few options within arm’s reach. 

We can decrypt the file with Passware Kit Forensic directly. Passware Kit Forensic is one of the most comprehensive, well-maintained, and supported password recovery tools commercially available. If you have Passware Kit Forensic installed on your workstation, you can export the file from EnCase or add Passware as a file viewer for right-click efficiency.


Passware Kit Forensic provides decryption capabilities for over 200 file types and implements a full spectrum of attacks, from instantaneous decryption to brute force. I won’t provide a full treatment of Passware Kit Forensic  here, so take a look at the Passware site for more resources. 

One approach worth mentioning is the dictionary attack. Dictionary attacks are a relatively intelligent solution to a vast problem: If we’re trying all the potential permutations of a password, where shall we begin? Conveniently, humans think and communicate in words, so words are a reasonable place to start when looking for decryption keys or passwords used by humans. Dictionary attacks use word lists as inputs to determine a decryption key. 

If a general set of words are a reasonable place to start, then wouldn’t words found within a specific data set be that much better? Wouldn’t including passwords found within a case, extracted from Windows or from OS X keychains also be a good starting point?  

After processing and indexing evidence in a case, EnCase enables export of words discovered in the case for use by Passware Kit Forensic dictionary attacks. It’s always wise to start with a good dictionary whenever possible, and Passware Kit Forensic makes sure the dictionary informs the attack execution plan.


Adding it all up: Efficient, Manageable, Scalable

Of course, the principal problem of password recovery is not determining what you can recover, nor using the right technique. Inevitably, any standing password recovery capability needs to make computationally expensive tasks efficient and manageable. 


I have two Tableau Password Recovery servers in the lab. Working together, they accelerate password recovery attacks by orders of magnitude relative to use of a CPU alone. Each server comes outfitted with four Tableau Accelerator Gen2 PCI boards (TACC2). Protected files, like PGP self-decrypting archives can be attacked at rates exceeding 1.5 million passwords/second. Multiple Tableau Password Recovery servers can operate in parallel with linear performance scalability. If you need greater acceleration, simply add another server. 

Tableau Password Recovery has been directly integrated into EnCase, making recovering password protected files a few clicks away. Select files to recover, submit them to the Tableau Password Recovery server, and monitor the status.


When password recovery has completed a job, the recovered file can be retrieved and automatically added to the case, including the recovered password and execution log for further review. The decrypted file is automatically linked to the original protected file. It’s a minor thing, but we know it makes for one less thing to track. 

Any treatment of practical password recovery would be incomplete without mentioning GPU-based acceleration. GPUs effectively accelerate many password-recovery algorithms. But that performance comes at a cost. Today’s single card solutions consume 300W under load, and multi-GPU configurations require power supplies in excess of 1000W. Greater power consumption increases operational costs in the form of cooling and component failure. Reliably sourcing compatible replacement parts can be challenging, creating ongoing maintenance, testing and other hidden costs. GPUs excel at high-end throughput, but top-end speed can’t be the only factor in a practical password recovery. 


The table above compares passwords-per-second versus passwords-per-second-per-watt for three different password-recovery solutions. Passwords-per-watt turns out to be a good way to describe not only top-end speed, but also the inherent reliability and manageability of the system. Tableau Password Recovery achieves acceleration on par with multi-GPU solutions, while sipping watts.

Finally, Tableau Password Recovery is a Tableau forensic product to the core. The FPGA-based accelerator technology not only allows the system to run cooler, but also enables future flexibility. As with all Tableau products, Tableau Password Recovery will receive no-cost software updates without requiring hardware changes. These updates will add new algorithms for acceleration as well as improve efficiency of existing accelerators. 

If you find this information useful, or would simply like to learn more, I’m happy to chat via comments below or reach me on Twitter @kenmizota.

EnScript® Showcase – EnCase® App Central, Evidence Management and Reporting

$
0
0

Part 1 of 3 – EnCase App Central & Manfred's Comprehensive Case Template

Robert Batzloff 

Now that the Enfuse Call for Papers has just gone out, I'm reminded of all the hard work that went into CEIC earlier this year. While there was record attendance, I know not everyone was able to make it to Vegas and so I wanted to re-examine a few EnScripts that were showcased in May; specifically EnScripts designed to save time, manage evidence and help create quick, professional reports. In this three part blog series I'll show you how to access and navigate EnCase App Central, how to join the EnCase Developer Network and I'll walk you through these EnScripts:

  • What's New in App Central
  • Manfred's Comprehensive Case Template
  • Time Zone Prior to Processing
  • Quick Report 
    EnCase App Central is an aggregate for EnScripts, filters, templates and almost any other mod you can think of for use with Guidance Software products. It's designed similarly to your typical e-commerce site, except that 90% of its catalog is free. Populated with over 150 EnScripts, these small executables are designed to work with or within EnCase, adding or automating features and giving users the opportunity to customize their EnCase experience. Most of these EnScripts are written by hands-on users and experts like those of the Guidance Software training team and many experts in our EnCase community. The catalog is also home to several integrations designed by third-party developers like Image Analyzer, Cisco AMP Threat Grid, and Magnet Forensics.

    You can find EnCase App Central at the Guidance website (www.guidancesoftware.com) under the Products link in the top banner, or by jumping directly to EnCase App Central.


    From the EnCase App Central home page you can view all EnScripts, search for a specific EnScript, or apply for the EnCase Developer Network, where you'll be given the tools and support to create and submit your own EnScripts. Acceptance into the program grants you these benefits:

    • An EnCase Developer license (Dongle)
    • Exclusive access to the v7 SDK
    • Access to up to date information on programing EnCase EnScripts
    • Receive pre-release builds of EnCase
    • Receive code samples
    • Receive sample evidence files for testing
    • Access to Guidance technical support
    • Guidance will QC your work
    • Exclusive rights to publish your EnScripts on EnCase App Central
    • Worldwide visibility for your EnScript
    • Guidance will manage the purchase of your work
    • Customer feedback on your EnScript
    • Ability to offer your EnScripts for free or for a fee

    What's New in App Central   

    Download Here

    The first EnScript I want to talk about is called, What's New in App Central. It can be run from the home menu and does not require a case to be open. This EnScript checks EnCase App Central to see if any new EnScripts have been recently added. Its simple UI shows the last time you used the EnScript to check EnCase App Central's inventory and all the previous EnScripts available. Clicking 'check' provides you with a list of all the new EnScripts that have been added to the site or updated since your last visit.

    It's one of my favorite EnScripts because it's a creative use of the EnScript language and really shows the variety of things you can create with EnScript. It's a quick, easy way to see what new or updated EnScripts are available without having to leave EnCase.

    Clicking any of the EnScript titles will take the user directly to their product page where the EnScript can be downloaded.


    Manfred's Comprehensive Case Template

    Download Here

    Manfred Hatzesberger (@manfred_encase) joined Guidance Software as an instructor in January of 2006, and is the Training Manager at the Pasadena office. Originally from Germany, Manfred conducts numerous courses in Europe in his native language, in addition to our US based facilities. He knows EnCase. He knows investigations and he knows investigators.

    When investigating you're going to come across a laundry list of artifacts that require further investigation or provide the evidence needed to close a case. To capture these items within EnCase you'll use bookmarks.

    To use bookmarks, select an item or blue-check multiple items then right click. From the menu select 'Bookmark'.

    All bookmarked items will be viewed in the bookmark view tab. The folder structure of the bookmark view is determined by the template selected when creating a case. The structure can be added to or edited during your investigation depending on what artifacts you encounter, the structure is also what creates the outline of your final report.


    Manfred's case template is populated with 80+ bookmark folders that account for a majority of the artifacts encountered by a digital forensic investigator. This comprehensive folder structure is helpful when organizing evidence during your investigations. Before your investigation even begins, Manfred's template has created a home for anything you'll want to revisit, investigate further or include in your report. My favorite part of the template is how well it translates into a final report, its structure and helpful folders make sure your evidence will already be prepared in an order best suited for presentation.

    Once you've downloaded the template from EnCase App Central, you just need to drop it into the template folder wherever your copy of EnCase 7 is installed (Program Files > EnCase> Templates) and it will be available the next time you launch EnCase.


    Thanks for reading. Stay tuned for part two of this series where I'll walk you through Jamey Tubb's excellent EnScript, Time Zone Info Prior to Processing. If there is an EnScript category you would like me to cover or maybe a single EnScript you think deserves some more coverage or if you'd like a tutorial for any of the 150+ available EnScripts, please let me know in the comments.

    You can also connect with EnCase App Central via their Twitter account (@EnCase_Apps), where you can find links to all the new or updated EnScripts the day they're made available.

    If you have any questions regarding the EnScripts discussed in this blog post you can email EnCase App Central directly encaseappcentral@guidancesoftware.com or utilize the EnCase App Central support portal, each EnScript developer has a discussion board dedicated to answering questions or posting more information about their EnScripts.

    Q&A: Transitioning from EnCase Version 6 to Version 7 Webinars

    $
    0
    0
    Ken Mizota

    At parts 1 and 2 of the webinar series, "Transitioning from EnCase Version 6 to Version 7," we ran out of time to answer all of your questions. In this blog post, I've attempted to answer them and hope it helps you continue a productive transition.

    View the webinars: Part 1 and Part 2

    Can you discuss how you’ve made reporting less complicated and what resources we could use to simplify reporting even further?

    Once the hard work of painstaking analysis and review of an investigation is complete, determining what to share with an external audience is an important, but often time-consuming task. EnCase® Version 7 provides powerful tools to efficiently incorporate the findings of the investigation into a polished examination report with a minimum of effort. While powerful, Report Templates can have a steep learning curve, and particularly in time-sensitive investigations, simplicity may be more desirable than power. When time is precious and working with Report Templates is more complex than desired, we built the Report Template Wizard to make it faster and easier to perform basic reporting modifications directly from Bookmarks.

    You can quickly add a Bookmark Folder to the Report Template, specify metadata, perform basic formatting, and preview the report. The Report Template Wizard simplifies reporting while maintaining the power of Report Templates.

    We have lots of OS X investigations. What have you done or are you doing to improve MAC support?

    In comparison to even just a few years ago, OS X investigation volume continues to grow. In support of this growing need, EnCase 7 has incorporated several capabilities specific to Mac investigations.

    EnCase 7 offers comprehensive support for the HFS+ file system, including parsing of extended attributes and double files. Native support is provided for visibility inside OS X disk images, like DMG, bundles, sparse bundles, and the ability to decrypt containers protected FileVault1.

    An OS X Processor Module is included to automatically harvest common system information, plists (XML and Binary) as well as system event logs.

    EnCase 7 maintains support for investigation of the latest OS X 10.10 Yosemite versions, including remote investigation of a single OS X machine over the network. When operating in this mode, EnCase 7 has full access to logical volumes, which contain data in an unencrypted state, even when protected by FileVault 2.

    I could go on for an hour on this topic alone, but it’s worthwhile to mention a couple of resources:

    Take a look at our Digital Forensics Today blog for articles on examining Time Machine Backups and the Quick Look Thumbnail cache.

    Check out EnCase® App Central, where several EnCase integrated utilities for OS X investigations are available for free download.

    You didn’t discuss decryption. Can you talk a bit about your decryption capabilities?

    Dealing with full-disk, full-volume, and file-level encryption is increasingly a firm requirement of any investigation. If your tool can't read the data, it doesn't matter how many artifacts are parsed, or how faithfully the evidence is preserved. You won't find much, and it’s a really inconvenient problem.

    Encryption vendors are not incentivized to make it easy to decrypt their protection. Yet, this is exactly the capability investigators need.

    EnCase 7 addresses this problem by partnering with the industry leaders in encryption technologies and by delivering fully supported decryption capabilities. Some examples of the partners we integrate with include: Symantec Endpoint Encryption, PGP Whole Disk Encryption, Sophos SafeGuard, WinMagic SecureDoc, Dell Data Protection, McAfee Drive Encryption, and more.

    I often hear from investigators: "This decryption capability saved my bacon." It's good in a tight situation.

    If you want to triage a case but don’t want to process the case first, what is your recommendation?

    I think is really important that investigators understand there is a lot of diversity problems and how they need to be solved. Investigators must not only overcome obstacles of understanding the data, but also doing so within time constraints. There's no single way to triage, so EnCase 7 enables several techniques:

    a. At times, all you need is a quick look of the evidence to determine whether the evidence is worth processing. Opening an evidence file, or multiple evidence files and viewing them in a single view can be very efficient. Add a couple evidence files or network previews to your Case. In the evidence pane, blue check the files and click the Open button. All of the file system entries can be recursively displayed and sorted, for a quick read of the files and metadata present.

    b. Going a bit deeper, you might want to perform some level of processing of the evidence, but want to review the data as it is being processed. The EnCase Evidence Processor provides Prioritized processing, which allows the investigator to review user created data first, as it is processed, independent of the contents of the rest of the evidence.

    c. Finally, if you have a good sense of what you are looking for, but still want to perform some basic processing on the data itself, an investigator can perform a search to create a result set, and then just process the items in that result set.

    I hope you'll take away  the fact that the EnCase toolset gives you many options that can be adapted to your needs and workflow.

    Can you provide insight into how to set up the processor settings so that EnCase processes the evidence quickly and effectively?

    Entire papers have been written and training labs built on this topic, so I won't go into great detail here. Digital Intelligence, makers of the famed FRED workstations, have published a great article on hardware selection for EnCase 7, which I highly recommend.

    If I have one bit of advice to share, it’s that disk I/O on the EnCase Evidence Cache is the first determining factor of performance in EnCase 7. We're dealing with large datasets with millions of items, so having the fastest I/O subsystem and devices is highly recommended. This is much different than the way EnCase 6 was architected, and having an understanding of this is central to a good experience.

    How do you mount (View File Structure) multiple files at the same time?

    You can trythis EnScript®-based filter, available on EnCase App Central.

    How could I add the SHA1 hash value to be showed below the MD5 value in the report? 

    This can be easily modified using the Report Template wizard. You can learn more about this feature in an earlier blog post on the topic.

    Can you change reporting properties in Bookmarks?
    How do you customize different attributes to show in your report, such as file extension, hash value, deleted etc..?
    How could I add the SHA1 hash value to be showed below the MD5 value in the report? 

    We've made modifying and editing reports much simpler in recent releases. From the Bookmarks view, right click on the Bookmark Folder you want to add to your report. You'll be presented with a dialog that allows you to select the part of the report you'd like to add the folder to, and if you like, you can customize the metadata you would like displayed.

    I've put together a brief blog post on this topic, which I recommend if you want to learn more at your convenience.

    Can v7 analyze IE 11?

    Yes, EnCase offers support for parsing and analyzing contents of IE10 and 11 data formats - specifically, the Extensible Storage Engine format, ESEDB.

    Ashley apparently showed an inclusion hash list.  How would you show excluded hashed items such as from the NSRL list? 
    Using Hash Libraries, is it possible to easily EXCLUDE hash values? I think the example used here was filtering looking for specific hashes

    The Find Items by Hash Category filter includes the ability to invert the results, which finds items NOT in selected categories. In this way, you can control what you want to see by selecting hash categories and choosing to invert or not.

    Check to invert - find items not in selected categories


    Can you talk about the difference between conditions and filters and when you should use one versus the other?

    Filters and Conditions functionally perform similar tasks: subjecting data to criteria and presenting a result set to you for review. 

    Conditions are intended to be used to filter in on specific metadata about a file. A point-and-click user interface is provided to implement simple or complex, boolean logic operating on the metadata of files or emails. 

    Adding simple or complex logic to metadata operations on files or emails

    Filters allow for more complex logic. Algorithms can be implemented in Filters to work with metadata or content of evidence. Filters are built by Guidance Software, or by investigators comfortable with the EnScript programming language. Several filters are included with EnCase, and you can find more on EnCase App Central

    Why can't I layer conditions and filters like I could in Version 6?

    Earlier releases in v7 did not include this capability. More recently, you can create Result Sets from your conditions and filters. Result Sets can then be subsequently filtered to achieve layering of searches. 

    Run Find Items by Hash Category


    I’m confused about what is a record versus a bookmark versus something else in v7. It’s different in v6.  Can you provide some clarity?

    Records result from analysis of data residing within an evidence file. They represent derived data. 
    Bookmarks are a reference to data in your case. They represent an investigator’s commentary and notes. 

    EnCase Version 6 treated all data as if it resided in an evidence file, in a specific tree structure. When dealing with composite artifacts, such as system information, Internet artifacts, or even a complex i-nbox folder structure in a PST, a singular tree structure encompassing ALL data wasn’t sufficient for dealing with large volumes of items. 

    Version 7 adds the ability to differentiate between entries in a file system from records derived from the data, and keeps  the ability to annotate, comment, and report on either in Bookmarks. 

    I haven’t seen a module for rebuilding webpages. Do you have one?

    There is a webpage rebuilder EnScript available on EnCase App Central.

    My favorite feature of v6 was being able to Timeline -- is there anything like that in v7 or is there a plan to include it in upcoming releases? 

    I recommend reviewing the MACE Timeline EnScript on EnCase App Central. 

    It seems that v7 is intended for complex cases, whereas v6 was intended to handle simple cases. How can I effectively use v7 for simple cases?

    In the last webinar, I talked a bit about triaging a case using v7. In short, v7 can be used for simple triage and for viewing file systems quickly and efficiently. It also has the range to handle larger, more complex cases involving many types of data for review. 

    One of the triage features discussed is the ability to open multiple devices simultaneously, performing a recursive "green plate" search, and sorting all entries across devices simply. 

    Open multiple devices simultaneously


    EnCase should provide an accurate estimate of how much longer processing is going to take. My company uses it for incident response, and the client wants to know when they will be provided results. The fact that it can take between a day and a week is unacceptable.

    Version 6 is no different in this regard. Depending on what you ask EnCase to do, performance will vary. 

    In v7, we introduced the Performance view within Evidence Processor Manager. This allows you to view the precise work that is being executed at the moment, including an estimate of progress. 

    The evidence cache takes up quite a bit of space. I can I manage it more efficiently on my system.

    Whereas v6 could take minutes or hours to open a case with many evidence files and many bookmarks, v7 can open such cases within seconds. How does v7 do this? The answer is the evidence cache. 

    The size of the evidence cache can be quite large, and that is simply inevitable when processing and extracting data from large evidence files. 

    The most effective way of managing the size of the evidence cache is to perform only the processing and analysis that you need. For example, using the File Carver module to extract files from unallocated space can significantly increase storage requirements, because each individual file is being extracted for review. If your case doesn't require carving in unallocated, then this analysis may be eliminated, reducing the impact on the evidence cache. 

    In EnCase® Enterprise, to get a memory image I need to add host list (of IP addresses) as targets, Why can I not pick from a list of machines that EnCase knows have servlets installed!?

    Neither v6 nor v7 has a method of determining where servlets are installed. The servlet is passive by nature, which means it does not reach out to communicate with the EnCase Examiner or SAFE. This avoids introducing unnecessary network traffic. 

    What should I expect when I use File Carver in v7? It doesn’t appear to work as well as the file carver in v6.

    File Finder and File Carver offer different capabilities. We have a detailed knowledgebase article on how File Carver works and the differences between File Carver and File Finder on the Guidance Software Support Portal.

    In v6 I could choose the option ‘Tag Selected Files’ in Bookmarks so that they’d show up in Entries already checked. Is there a similar function in v7?

    Both Tag and Untag Selected Items, as well as the inverse, Select Tagged Items, are possible in EnCase 7. 


    Does the case files size grow as a result of the indexing process? Does this have any impact on the performance of the software?

    The case file does not grow significantly, but the Evidence Cache, a component unique to EnCase 7, will grow with the size of the data indexed. In some ways, the performance of the software is enhanced by having more data indexed – index searches are faster, more convenient, and more versatile than raw keyword searches. 

    In v6 I could export a quick report based on items I had checked and any columns I wanted in the Entries pane. Is there a similar function in v7? 

    Yes, in the upper right corner of the table view, you can click “Save As”. 


    Does the IM Parser recover instant messenger conversations from Microsoft Lync 2010?

    No, not at this time. 

    Can v7 parse out chats from smartphone extracted in EnCase?

    The smartphone examiner can extract SMS messages, but due to the variety of chat applications and artifacts on smartphone operating systems, EnCase does not claim to support extraction of all chat applications or artifacts. 

    The ability to sweep bookmarks was not available in early versions of 7. Has this functionality been added in since?

    Yes, after sweeping text in Text or Hex tabs, you can right-click, select Bookmark, and then Raw text. 

    Questions? Have v7 tips of your own? I welcome discussion in the comments section below.

    EnScript Showcase: EnCase App Central, Evidence Management and Reporting

    $
    0
    0
    Robert Batzloff

    And we’re back with another post to walk you through one of the over 150 EnScripts® that can be found at EnCase® App Central. This three-part series will introduce and explore four EnScripts to help you make the most of EnCase App Central, manage and organize your evidence, and finally, show you a new option when it comes to creating your case report. In the previous post we discussed What’s New in App Central and Manfred’s Comprehensive Case Template. In this post we’ll walk through Jamey Tubbs’ incredibly helpful, time-saving EnScript: Time Zone Prior to Processing.


    Time Zone Prior to Processing

    Download Here

    As an examiner it’s critical to determine the time zone settings of hard drives with the Windows OS installed before processing the evidence. Time stamps and other temporally related items usually provide the most damning evidence or the best alibis. Without the proper time zone setting, the former can easily become the latter and then the bad guy walks.

    If regional time zone settings are not defined by the user, then by default EnCase implements the examination machine’s regional settings on the case during processing. It’s not a good idea to let EnCase determine the time zone based on the examination machine’s settings. Doing so runs the risk of invalidating evidence because multiple evidence files from multiple computers may have different regional settings, different from one another as well as the examiner’s machine.

    What you should do is locate the time zone setting for each device, bookmark these settings, and then manually change each device’s time zone settings under the device menu. The steps involved in properly determining a device’s time zone setting are pedantic, time-consuming, and include navigating the SYSTEM registry hive, combing through ControlSet subfolders, interpreting hex with Little-endian, etc.

    Enter the "Time Zone Prior to Processing" EnScript

    Instead, you can use this EnScript, created by Guidance’s own Jamey Tubbs (@JameyTubbs), and automatically parse out the proper time zone information for each device. The EnScript then automatically creates a bookmark folder for every device in your case containing time zone information, making this info easy to find and reference.

    The one thing the script does not do is make the change within the device settings; you need to complete this final step on each evidence file before processing. I’ll show you how to run the EnScript and then note when and where you must make these changes.

    Like most EnScripts on EnCase App Central, this EnScript is simple to run. Select the EnScript option from the toolbar and run Time Zone Prior to Processing. Most EnScripts contain a unique UI or menu but this EnScript automatically runs and its progress can be seen at the bottom right of the screen.

    Once complete, a bookmark folder titled Time Zone Information will be created in the tree pane. Within it will be subfolders for each device’s respective time zone information. Selecting the device in the table pane and selecting the ‘report’ tab in the view pane will show you the TimeZoneRegistry Data, here you’ll find the information you’re looking for.

    Gotcha, Peterson.

    This last step is arguably the most important and must be done manually. The EnScript only gives you the time zone information; it’s up to you to implement it. If you don’t and then process your evidence, you run the risk of reporting incorrect time zone information. And again, bad guy goes free.

    To change the device’s time zone setting go to the Evidence, Viewing (Entry) tab. Right-click on the evidence file in the left pane; select Device, Modify Time Zone Settings. Select the proper time zone as noted in the newly created bookmark folder and then process your evidence.


    There you have it. One free EnScript developed by one of our long-term trainers can save you time and make sure your evidence is in proper order before processing. 

    Thanks again for reading. Our next post will highlight the fantastic EnScript, Quick Report, from Brett Liddicoet. If there is an EnScript category you'd like me to cover or maybe a single EnScript you think deserves some more coverage, or if you’d like a tutorial for any of the 150+ available EnScripts, please let me know in the comments.

    You can connect with EnCase App Central on Twitter account, where you can find links to all the new or updated EnScripts the day they’re made available. 

    If you have any questions regarding the EnScripts discussed in this blog post, drop us a line or visit the EnCase App Central support portal. Each EnScript developer has a discussion board dedicated to answering questions or posting more information about their EnScripts. 

    EnScript® Showcase – EnCase® App Central, Evidence Management and Reporting

    $
    0
    0

    Part 3 of 3 – Reporting with Quick Report

    Robert Batzloff


    This series of blog posts has focused on keeping your investigation organized and presenting your evidence in a clear, correct and readable format. Clarity, as well as brevity, is key when delivering digital forensic evidence to those who don’t work in the field. This evidence can be dense and hard to understand. Your job is to make the relevant information apparent and easy to digest. You want the information you present to be easy to explain and defend because opposing council will leap at the chance to capitalize on any potential ignorance regarding digital forensics.

    As reporting is the final step in an investigation, we’ll close this blog series by looking at my favorite reporting EnScript: Quick Report Lite

    Quick Report Lite

    Download Here

    Brett Liddicoet’s Quick Report EnScript creates a fully linked HTML report from the examiners selected bookmark folders. Bookmarks, they’re like the gift that keeps giving. As mentioned before the bookmarks create the outline for the report, so a well-organized bookmark structure will result in a clear, readable report.

    Brett’s script makes it incredibly easy for you to customize the report’s logo, requiring no HTML, and it also allows you to link reports from other forensic tools and other external files. Quick Report makes it easy to create and submit reports from the field or quickly share up to the minute updates on a case’s status. This report can also be easily distributed on CD or USB and it’s compatible with Internet Explorer, Firefox and Safari.

    Launch Quick Report from EnScript menu bar when your investigation is complete and you’re ready to create a report. Once launched, Quick Report’s menu opens in its own window. From here you can select which bookmark folders you’d like to include in the report. You can choose which format you’d prefer the contained data be displayed as well as which logo and case information you want attached to the report. Selecting a new logo is easy and only requires a destination folder. You can also add external links in the same way from this menu.


    Once you have chosen all your settings, select ok and the fully-linked report will open in your default browser. You can see that the custom logo is displayed on the top left, the case info and linked bookmark folders just below it, and the selected bookmark folder’s contents to the right.


    All relevant files displayed on the right also feature an icon in their top right corner. This is a hyperlink that reveals further data regarding the bookmarked item.

    Brett’s EnScript is available in the free Lite version discussed here, as well as a pro version for $39.00 that includes customizable templates, print options and more.

    Thank you once more for reading. The four EnScripts I've written about in this showcase, as well over a 100 more can be found at EnCase App Central for absolutely free.

     Oh, wait.
     
    I plan to post several more blogs showcasing the EnScripts available at EnCase App Central. If there is an EnScript category you would like me to cover or maybe a single EnScript you think deserves some more coverage or if you’d like a tutorial for any of the 150+ available EnScripts, please let me know in the comments.

    You can also connect with EnCase App Central via their Twitter account (@EnCase_Apps), where you can find links to all the new or updated EnScripts the day they’re made available.

    If you have any questions regarding the EnScripts discussed in this blog post you can email EnCase App Central directly encaseappcentral@guidancesoftware.comor utilize the EnCase App Central support portal, each EnScript developer has a discussion board dedicated to answering questions or posting more information about their EnScripts.

    Best Practices in Recovering Data from Water-Damaged Devices

    $
    0
    0
    Mobile devices are everywhere. The evidence they hold can be the key to a successful investigation outcome, if you are able to acquire it. Water-damaged phones add even more complexity. How successful have you and your agency been in responding to water-damaged devices?

    Steve Watson, a technologist focused in the areas of e-discovery, forensics, risk and compliance, posed this question to a full house at Enfuse (CEIC 2015) earlier this year. The popularity of his session, “Water-Damaged Devices – An Analysis of Evidence Locker Corrosion,” made a clear statement that EnCase® users are ready and eager to learn how best to tackle the data that resides on damaged devices.

    If you missed this popular lecture, you can read a brief summary of it in this blog, and also download the complete slide presentation here: Water-Damaged Devices: An Analysis of Evidence Locker Corrosion.  We’d also like to remind you to register early for Enfuse 2016, where you can hear similar topics that will showcase the latest and most innovative tools and techniques to make your job easier as a forensic investigator.

    Survey Proves More Research is Needed on Damaged Devices

    Recently, Watson performed an industry survey of federal, state, and local agencies to gather trends in damaged devices. What he found was that most agencies receive water-damaged devices so infrequently that they can’t develop solid experience in this area:


    The survey was used by Watson to launch The Damaged Devices Project—a series of research projects whereby devices are exposed to damage with scientific precision, followed by remediation and documentation. The results are then published to the digital forensics community. The scope of his research is on liquid damage, thermal damage, impact damage and ballistics damage.  His session at CEIC (Enfuse), however, focused specifically on the damage that occurs to mobile phones that have been submerged in water. 

    Watson reported from his survey responses that most devices spend less than 30 days under water:

    The majority of forensic examiners said a damaged device sits in an evidence locker room for at least three days before it is retrieved for cleaning in preparation for data acquisition. The problem here, according to Watson, is that as the duration of time increases that a water-damaged phone waits in evidence storage to be prepared for data acquisition, the corrosion and sediment buildup also increases exponentially.

    In addition to risks of mold, biological hazards, battery damage, and electric discharge, mobile devices that stay zipped up in a locker room evidence bag will show greater liquid damage, including:

    • PCB layer damage
    • Rust
    • Pitting on the PCB traces
    • Corrosion (galvanic or electrolytic)
    • Damage to SMT leads

    Top Five Recommendations to Remediate Water-Damaged Phones

    The audience walked away with Watson’s top five recommendations in remediating water-damaged devices:

    1. Remove the battery as soon as possible
    2. Do not attempt a power-on or charge until dry
    3. The device is more stable if transported in water to the lab for cleaning
    4. If you can’t transport the device in liquid, disassemble and make a best effort to dry it before shipping or storing
    5. Do not expect a successful acquisition from devices that have remained in evidence bags for nine months or more 

    Watson maintained an interactive session through a live demonstration of two phones that had been submerged for three days in water and then stored in an evidence bag for 221 days. The damaged phones were used to share best practices in phone disassembly, identification of damaged areas, and cleaning and drying of the device. To get the rest of these best practices and more, click here to download the complete presentation: Water-Damaged Devices: An Analysis of Evidence Locker Corrosion.   

    You can also track or participate in this ongoing research on damaged devices by visiting Watson’s website: The Damaged Devices Project.

    Don’t forget that you can attend other top-notch sessions like this one at Enfuse 2016 in Las Vegas, May 23-26, 2016. Enfuse brings the power of hands-on labs, learning sessions, and networking events together in a way that will take your work—and your career—to a whole new level. 

    Click here to learn more about Enfuse and how you can save over 40% off the regular conference registration fee if you act by November 30, 2015.

    Sneak Peek at One Piece of Our New Logo

    $
    0
    0
    UPDATE: We have our three winners! Thanks for playing and helping us celebrate our new look and logo, everyone.


    Original blog post

    Since 1997, Guidance Software has had a look--was it a watch or a stack of discs?--but we decided it was time for a makeover. To give you a sneak peek at it prior to this week's official unveiling, we've decided to deploy the classic "Easter egg" hunt within our HTML code.


    We'll have an official press announcement revealing the new logo just after 1:00 on Wednesday, November 4, but those of you are reading this can earn a special preview by finding the "Easter egg"--a link to one piece of our shiny new logo somewhere in this blog post. In fact, you'll soon find clues to the locations of the other three Easter eggs on our @EnCase account on Twitter (no Twitter account required to view our page) and to our Facebook page. Just email all four parts AND the four URLs where the pieces were found to newsroom@guidancesoftware.com.

    The first three players to send the correct logo -- based on email timestamps -- will win a $250 American Express gift card, plus a t-shirt and coffee mug emblazoned with the new logo.

    Get to know our new look before the rest of the world -- we dare you!

    And of course... there's some fine print

    1. ENTRY:  No purchase necessary to enter or win. Contestants will enter by submitting images and URLs via email to newsroom@guidancesoftware.com.
    2. ELIGIBILITY: This contest is open only to legal U.S. residents over the age of 18. Employees of Guidance Software, Inc. (“GSI”)(along with its contractors, affiliates and subsidiaries) and their families are not eligible. Void where prohibited by law. Contestants residing in those areas where the contest is void may participate in the contest, but may not win any prizes. 
    3. WINNER SELECTION:  Social media posts to Guidance Twitter and Facebook profiles/pages will give clues as to where to find a hidden link to one of four parts of our new logo. Participants must figure out where the posts are in our multiple blogs, find the links, click through, and email all four pieces along with the four URLs where the pieces were found to newsroom@guidancesoftware.com. First three players (based on time stamps in email) to submit the four logo pieces and URLs to newsroom@guidancesoftware.com win prizes named below. All decisions of the judges are final.
    4. PRIZES:  Winners will receive a $250 American Express gift card and GSI-branded merchandise with a maximum value of less than $50, including a polo shirt and coffee mug.
    5. WINNER NOTIFICATION: Winners will be notified within 14 days after the determination date.  Inability to contact a winner may result in disqualification and selection of an alternate winner. 
    6. GENERAL CONDITIONS: Participants hereby grant GSI a non-exclusive, perpetual, worldwide license to broadcast, publish, store, reproduce, distribute, syndicate, and otherwise use and exhibit the Submission (along with their names, voices, performance and/or likenesses) in all media now known and later come into being for purposes of trade or advertising without further compensation. 
    7. USE OF CONTEST INFORMATION: All entries become the property of GSI. GSI reserves the right to use any and all information related to the contest, including submissions provided by the contestants, for editorial, marketing and any other purpose, unless prohibited by law.  
    8. NOT ENDORSED BY FACEBOOK OR TWITTER: By participating in this contest, you acknowledge that this contest is in no way sponsored, endorsed or administered by, or associated with, Facebook or Twitter and release Facebook and Twitter from any and all liability arising from or related to this contest. The information you are providing for this contest is being provided to GSI and not to Facebook nor Twitter, and will be used to notify you if you have won, and to inform you about special offers from GSI.
    9. CONDUCT: All contest participants agree to be bound by these Official Rules. GSI in its sole discretion, reserves the right to disqualify any person it finds to be tampering with the entry process, the operation of its web site or is otherwise in violation of these rules.
    10. LIMITATIONS OF LIABILITY: GSI is not responsible for late, lost or misdirected email or for any computer, online, telephone or technical malfunctions that may occur.  If for any reason, the contest is not capable of running as planned, including infection by computer virus, bugs, tampering, unauthorized intervention or technical failures of any sort, GSI may cancel, terminate, modify or suspend the contest.  Entrants further agree to release GSI from any liability resulting from, or related to participation in the contest.
    11. WINNERS LIST: The names of the winner may be obtained by sending a self-addressed stamped envelope to: Social Media Contests, GSI, 1055 E. Colorado Blvd., Pasadena, CA 91106.

    Now Available OnDemand: Advanced Internet Examinations Course

    $
    0
    0
    Good news: Now you can learn the latest browser artifacts and peer-to-peer sharing applications in our newly recorded EnCase OnDemand Advanced Internet Examinations course. Examiners who take this updated class will leave equipped to understand user activity and recover evidence critical for your investigations.

    What We'll Cover

    We'll guide students through such topics as:

    • Internet activity: Google Chrome, Internet Explorer, and Firefox – all updated with the latest artifacts
    • Peer-to-peer file sharing applications: BitTorrent, Ares, and Gigatribe
    • How to rebuild webpages from the cache
    • Web search engines
    • Email fundamentals, including recovering deleted emails

    Keep your skills up-to-date from the comfort of your home or office – no travel justification needed.

    For more details, check out the course syllabus here or reach out to our training staff via email.

    Wishing you a happy and prosperous 2016!

    NTID Forensic Boot Camp: Learning to be Your Own Advocate

    $
    0
    0
    The inaugural National Technical Institute for Deaf (NTID) forensics boot camp kicked off this week with a day-long training session. Throughout the week, students will have the opportunity to learn more about digital forensics, including Guidance Software’s suite of EnCase products.

    On Monday, participants met with Scott Van Nice, an NTID alumnae and computer forensics manager at Procter & Gamble (P&G). Scott discussed his career path, offering advice to the students on navigating the post-college world.

    When Scott interviewed at P&G, although he asked for an interpreter, one was not available. Working together, they were able to find a compromise – Scott and the interviewers used his computer to communicate.

    “Sometimes things go wrong and you have to find a way to make them work,” Scott told the students.
     
    Although he had been planning to take a trip to Europe, Scott decided to accept an internship at P&G. He told the students that they will sometimes have to weigh short-term gains versus long-terms gains to make decisions.

    After his internship, Scott accepted a full-time position at P&G. While there, he worked hard to ensure that the company can accommodate his and other people’s needs. He helped push towards a central fund for workplace accommodations at P&G – as opposed to having each department pay for it.

    “You need to become your own advocate,” Scott said.

    Scott has discussed his experiences at P&G publicly – “P&G exec: I've learned to embrace being deaf,” helping highlight issues around accommodation to pave the way for future employees.

    During his career, Scott earned his law degree and began to work in electronic discovery and computer forensics. However, he recognized that communication in the workplace was a challenge. Working with P&G, who helped him identify how to succeed at his peak, he was able to have a more vocal role – addressing team meetings – and eventually was assigned a personal interpreter. Currently, he is on track towards a Master’s in Informatics and is interested in insider risk which involves studying how to better protect internal data from malicious employees, third parties, or business partners. 

    During an interviewabout his experiences at P&G, Scott noted: “P&G recognizes that everyone is different, but what they bring to the table is exceptional.”
    ---------------------------------------------------------------------------------------------------
    Fast facts about NTID

    NTID is the first and largest technological college in the world for students who are deaf or hard of hearing.

    The college was established after President Lyndon B. Johnson signed the National Technical Institute for the Deaf Act. The bill provided for the establishment and operation of a co-educational, post-secondary institute for technical education of persons who are deaf or hard of hearing.

    Total of 1,413 students enrolled as of fall 2015. Undergraduate: 1,167 deaf and hard-of-hearing students, 151 students (enrolled in ASL-English Interpretation program).

    Training the Next Generation of Cyber Investigators; Be Fearless Says Patrick Dennis

    $
    0
    0
    High profile breaches, like Target, are just the tip of the iceberg.

    Our CEO Patrick Dennis discussed the state of cybersecurity with students at the National Technical Institute of Deaf, who are participating in their first-ever forensics boot camp.

    “There are many more breaches that people never hear about,” Patrick said. He believes that the number is much higher and that it is more likely there are at least 90 million breaches per year.

    Attacks are becoming more sophisticated and cybercriminals are customizing their attacks to the organization that they’re targeting. At least 60 percent of organizations will be successfully attacked or targeted this year.

    The cyber landscape is also constantly changing. For example, the number of devices attached to the Internet is increasing.

    “If it attaches to the Internet, it can be attacked and everything is connected to the Internet,” Patrick added.

    Companies are also shifting to doing more business digitally. However, there’s an estimated $3 trillion in lost revenue because companies can’t digitize fast enough due to security issues.

    Today’s Cyber Job Market

    There is a major labor shortage in the IT security industry, Patrick told the students. Thousands of jobs are going unfilled. “There’s an opportunity for you today,” he said.

    According to a project conducted by the Stanford University Journalism Program, more than 209,000 cybersecurity jobs in the United States and postings are up 74 percent over the past five years. The demand for information security professionals is expected to grow by 53 percent through 2018.

    “You’re picking up the industry’s hottest skill set,” he said.

    The Road to CEO

    “I didn’t have the most traditional path,” Patrick added.

    After his father had a heart attack when (Patrick) was in high school, he decided to go to college closer to home. He ended up working full-time at Eastman Kodak while attending Rochester Institute of Technology (RIT) at night.

    “I believe things in life happen for a reason,” he suggested.

    He started out as a developer, eventually transitioning into sales. He worked at Oracle, where he led the development of Oracle’s commercial business in North America. Patrick went onto become senior vice president and chief operating officer of EMC’s Cloud Management Division.

    “The path to CEO is not so straight,” he told the students, later adding, “I think it’s important to have goals but you never know what’s going to happen.”

    He also stressed the benefits of traveling and experiencing different cultures. Patrick has visited at least 20 different countries.

    “Traveling gives you a greater appreciation for communications and dealing with diverse people,” he said.

    Patrick also encouraged the students to embrace the ideas they come up with while at NTID, noting that his most inventive years were when he was younger.

    "Be fearless in acting on your great ideas."

    We've Moved! Visit Our New Blog

    Viewing all 114 articles
    Browse latest View live